Showing posts with label my pattern. Show all posts

Sunday, June 11, 2017

Amigurumi Cloud Troubleshooting

Hands down the most popular pattern on my blog is the pattern for the amigurumi cloud. It has probably more hits than the rest combined. It's also the pattern people seem to have most trouble with. And I get that. I wrote it the best I could, and couldn't really figure out how better to explain it. But I think I finally figured out a way to help! If you follow this guide, you'll just need to know the number of increases and decreases as marked at the beginning of each row of the pattern and you don't need to count the sc in between.

So here is a step by step guide to crocheting my amigurumi cloud pattern

Sunday, June 4, 2017

How to Crochet an Amigurumi Tooth Fairy Pillow

So, my baby just cut her first two teeth, so she isn't going to be loosing any anytime soon. (At least, I hope not.) And we don't really have a concept of a tooth fairy in Finland. But you see this cute stuff from other cultures (on Pinterest, mostly) and I'm a sucker for cute stuff. And you know I love amigurumi.
I started this blog to have a place to post my amigurumi patterns to, then my interest sort of waned. And how many stuffed animals can a person make and never use? The answer is of course as many as she likes. But, yeah,  I was trying to be an adult and I stopped.

Cue baby, and I'm like bring all the amigurumi!
So, here's a pattern for an amigurumi tooth, which can be used as a tooth fairy pillow (i.e. put a tooth in the pocket in the back, and see it magically turn into money during the night. Only works for children, I've heard.)
I used wool/polyamide mix yarn called 7veljestä, and an EU size 1,75 hook, but I crochet loosely, so if you crochet tightly, maybe use a bigger hook.
Amigurumi Tooth Pattern

Make a magic ring
  1. Sc 6 times in the magic ring (6).
  2. Sc inc around (12).
  3. Sc in the next 5, sc inc twice, sc in the next 5 (14).
  4. Sc around (14).
  5. Sc in the next 6, sc inc twice, sc in the next 6 (16).
  6. Sc around (16).
  7. Sc in the next 7, sc inc twice, sc in the next 7 (18).
  8. Sc around.
  9. Sc in the next 8, sc inc twice, sc in the next 8 (20).
  10. Sc around.
  11. Sc in the next 9, sc inc twice, sc in the next 9 (22).
  12. Sc around.
  13. Sc in the next 10, sc inc twice, sc in the next 10 (24).
  14. Sc around. 
  15. Sc in the next 11, sc inc twice, sc in the next 11 (26).
  16. Sc around.
  17. Sc in the next 12, sc inc twice, sc in the next 12 (28).
Finish off leaving a long tail (this is for sewing "the crotch" i.e. where the roots meet, shut later). Stuff.

Make another root the same way, but don't finish off. Mark this spot, from now on this will be the beginning and ending of the rounds. Join the two roots by crocheting where you left of on the first root.

18. Sc around (56).
19. Sc around (56). Around here is a good place to sew shut the small hole where you joined the roots together, later on it'll be more difficult.
20. Sc around (56).
21. Sc around (56).
22. Sc around (56).
23. Sc in the next 7 stitches in the back loop only, sc in the next 42, sc in the next 7 stitches in the back loop only (56).
24. Sc around (56).
25. Sc around (56).
26. Sc around (56).
27. Sc around (56).
28. Sc around (56).
29. Sc around (56).
30. Sc around (56).
31. Sc around (56).
32. Sc around (56). I recommend you start stuffing now, because as you decrease the hole will get smaller and stuffing more difficult.
33. Sc in the next 10, sc dec three times, sc in the next 24, sc dec three times, sc in the next 10 (50).
34. Sc in the next 9, sc dec three times, sc in the next 20, sc dec three times, sc in the next 9 (44).
35. Sc dec around (22).
36. Sc dec around (11).
37. Keep sc dec until you have a very small hole, then sew the hole shut and finish off leaving a long tail.

Thread the yarn on a sturdy needle and push it through the top of the tooth in to "the crotch" and back again, molding the top of the tooth as you like. Knot between the roots and hide the yarn inside the tooth.

Flip the tooth over. On the back where you on round 23 crocheted in the back loops only there are the front loops visible.
Sc across (14), turn. Repeat for 9 rows. Finish off. Sew to sides of the flap onto the tooth.
Embroider on a face. I went with blue eyes because black felt too much like cavities, but you can embroider on any face you like, of course!

You are done!

Tuesday, May 21, 2013

How to Crochet an Amigurumi Beetroot

012
The reason I started this blog was that in 2008 I discovered amigurumi. There was so many wonderful free patterns all over the Internet and once I got the hang of it I wanted to give back by sharing my patterns in return. I haven’t done any amigurumi for a long time now, but for some reason I got into my head yesterday that I wanted to crochet a beetroot.
And I did. And it was awesome.
017
PATTERN (I had to browse through the blog to see how to write a pattern, it’s been such a long time!)
I used wool yarn and 1,75 hook.
  1. sc 6 in magic ring (6)
  2. sc around (6)
  3. *sc, sc inc* around (9)
  4. *sc in the next two, sc inc* around (12)
  5. *sc, sc inc* around (18)
  6. *sc in the next two, sc inc* around (24)
  7. *sc in the next three, sc inc* around (30)
  8. *sc in the next four, sc inc* around (36)
  9. *sc in the next five, sc inc* around (42)
  10. sc around (42)
  11. sc around (42)
  12. sc around (42)
  13. sc around (42)
  14. sc around (42)
  15. *sc in the next five, sc dec* around (36)
  16. *sc in the next four, sc dec* around (30)
  17. *sc in the next three, sc dec* around (24)
  18. *sc in the next two, sc dec* around (18) (you should start stuffing around here before the hole gets too small)
  19. *sc, sc dec* around (12)
  20. sc dec around (6)
Cut yarn and stuff the last bit. Sew shut.
Now the leaves. (wool yarn: it’s hairy)
015
I just sort of winged it. For the smaller one I chained 11 with the beetroot colour and then changed into green yarn. I slipstitched into second chain from the hook and the next few and then just randomly sc, hdc, dc, tr around in a way that looked good to me. For the larger leaf, I started by chaining 16. I finished the ends and used the beetroot coloured yarn to sew them onto the beet. Let me know if you’d like a more detailed leaf pattern, I could try to whip something up. You could make as many leaves as you wanted of course, I just made two.
Beet from the back.
018
Beet from the front.
020
The end.

Thursday, May 20, 2010

How to Crochet an Amigurumi Strawberry

027[10]
The Berry
With red yarn chain 5.
  1. Sc in the second ch, sc on the next two ch, sc 3 times in the last chain, turn work and work on the other side of the chains, sc in the next two ch, sc twice on the last chain (10).
  2. Sc around (10).
  3. *Sc, sc inc* around (15).
  4. Sc around (15).
  5. *Sc on the next two, sc inc* around (20).
  6. Sc around (20).
  7. Sc around (20).
  8. *Sc on the next 3, sc inc* around (25).
  9. Sc around (25).
  10. Sc around (25).
  11. *Sc on the next 3, sc dec* around (20).
  12. *Sc on the next 2, sc dec* around (15).
  13. *Sc, sc dec* around (10), stuff.
  14. Sc dec around (5).
Sew the hole shut and finish off.
With green yarn sew random spots on the strawberry.
The Leaves
With green yarn make magic ring.
  1. Sc 6.
  2. *Sc, sc inc* around (12).
  3. *Chain 6, sc on the second ch from the hook, sc on the next 4 ch, sl st on the next sc* around (12 leaves).
Finish off, and sew the leaves on to the strawberry.

Monday, November 3, 2008

How to Crochet an Amigurumi Onigiri

It's been awhile since I last posted a pattern.
I've never tasted onigiri, but would like to. In the meanwhile here is a crocheted version.
066
I tried to write as clearly as possible, but if you have any questions, please ask.
Because of the triangular shape, sc inc would be insufficient, and instead the increases are done crocheting 4 sc in to a sc.
PATTERN
Chain 2 in white.
  1. In to the second ch from the hook sc 6.
  2. Sc inc around (12).
  3. *Sc in the next sc 4 times, sc in the next 3* twice, 4 sc in the next, sc in the next 5 (21).
  4. *Sc in the next sc 4 times, sc in the next 6* twice, 4 sc in the next, sc in the next 8 (30).
  5. *Sc in the next sc 4 times, sc in the next 9* twice, 4 sc in the next, sc in the next 11 (39).
  6. *Sc in the next sc 4 times, sc in the next 12* twice, 4 sc in the next, sc in the next 14 (48).
  7. *Sc in the next sc 4 times, sc in the next 15* three times(57).
Finish off. Make two.
Chain 57 in white, join with a slip stitch.
  1. Sc around
  2. Sc around.
  3. Sc around.
Join in to the back loops of the edge of the first triangle, and then on to the second triangle, matching the corners carefully. I suggest you start from the middle of one edge of the triangles, this way you can hide it under the nori part.
Chain 10 in black or dark green (I used black). Sc in to second hook from the hook and across (9). Turn. Sc 28 rows like this. Finish of and sew on to the onigiri.
As always, you could sew on a cute face;)

Wednesday, September 24, 2008

How to Crochet an Amigurumi Mushroom

075
099
PATTERN
With tan chain 2.
  1. Into the second ch from the hook sc 6.
  2. Sc inc around (12).
  3. *Sc, sc inc* around (18).
  4. *Sc 2, sc inc* around (24).
  5. Sc around (24).
  6. Sc around (24).
  7. Sc around (24).
  8. With brown, sc dec around in back loops only (12).
  9. Sc dec around (6). Stuff firmly, finish off and sew shut.
With tan chain 2.
  1. Into the second ch from the hook sc 6.
  2. Sc inc around (12).
  3. Sc around (12).
  4. Sc around (12).
  5. *Sc 2, sc dec* around (9).
  6. Sc around (9).
  7. Sc around (9). Stuff.
Sew the pieces together using tan thread.
You can use any other colours you like, too.

Wednesday, September 17, 2008

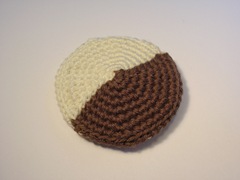
How to Crochet an Amigurumi Black and White Cookie

Yes, another crocheted cookie.
I'm not going to post a picture of the cookie I made, because the cookie has disappeared. It was on my desk and then it was gone. Where, I don't know. My guess is spontaneous digestion. It did look delicious.
If I ever find it, I'll post a picture. And maybe tell a tale of it's great adventures into the unknown...
PATTERN
With tan or a "cookie dough colour" of your choice chain 2.
  1. Into the second ch from the hook sc 6.
  2. Sc inc around (12).
  3. *Sc, sc inc* around (18).
  4. *Sc 2, sc inc* around (24).
  5. *Sc 3, sc inc* around (30).
  6. *Sc 4, sc inc* around (36).
  7. *Sc 5, sc inc* around (42).
  8. *Sc 6, sc inc* around (48). Finish off.
Make the topping in exact same way, except on the first round sc the first 3 with white and the next with brown (or if you prefer a darker chocolate, you may use black). On the next rounds you'll always crochet into the previous round's white sc with white and into the brown ones with brown. Here it is spelled out:
Chain 2 with white.
  1. Into the second ch from the hook sc 3 with white and 3 with brown (6).
  2. Sc inc around, first 3 inc with white, the next 3 with brown (12).
  3. *Sc, sc inc* around 3 times with white, 3 times with brown (18).
  4. *Sc 2, sc inc* around  3 times with white, 3 times with brown (24).
  5. *Sc 3, sc inc* around  3 times with white, 3 times with brown (30).
  6. *Sc 4, sc inc* around 3 times with white, 3 times with brown  (36).
  7. *Sc 5, sc inc* around 3 times with white, 3 times with brown  (42).
  8. *Sc 6, sc inc* around 3 times with white, 3 times with brown  (48). Finish off.
Now you have two options to sew the two pieces together:
  1. Sew the edges together with tan, all around.
  2. Sew the white half with white and the brown half with brown (this is what I did).
There you have it. I hope your cookie won't vanish.
EDIT: Here it is!
017

Tuesday, September 16, 2008

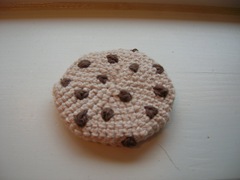
How to Crochet an Amigurumi Chocolate Chip Cookie

012
What a horrible picture once again!
Here is a pattern for a crocheted chocolate chip cookie. I seem to write my patterns using a bit different terms and directions every time. This is because I'm still trying to figure out the best way to write a pattern. I hope this is not too confusing!
PATTERN
Chain 2.
  1. Into the second ch from the hook sc 6.
  2. Sc inc around (12).
  3. *Sc, sc inc* around (18).
  4. *Sc 2, sc inc* around (24).
  5. *Sc 3, sc inc* around (30).
  6. *Sc 4, sc inc* around (36).
  7. *Sc 5, sc inc* around (42).
  8. *Sc 6, sc inc* around (48). Finish off.
Make two.
Embroider on the chocolate chips, note that what's normally the "wrong" or the back side will be facing outside! I liked this part the most. Usually when you embroider something you have to be really precise, but in this case the more deformed and weird the chips look the better!
Sew together along the edges the back sides facing out.
Do not eat!

Monday, September 8, 2008

How to Crochet an Amigurumi Sun

I crocheted a tiny sun with an orange blush.
011
But now that I look at these pictures, she looks like Pikachu.
It's a sun, I swear! Look:
021
Anyway, the principle is sound, I'm sure! And if you use a nice yellow colour instead of a ghastly mustard, it'll be really cute, I promise!
PATTERN
Chain 2.
  1. Into the second ch from the hook sc 6.
  2. Sc inc around (12).
  3. *Sc, sc inc* around (18).
  4. *2 sc, sc inc* around (24).
  5. *3 sc, sc inc* around (30).
  6. Sc around (30).
  7. Sc around (30).
  8. Sc around (30).
  9. Sc around (30).
  10. Sc around (30).
  11. *3 sc, sc dec* around (24).
  12. *2 sc, sc dec* around (18).
  13. *1 sc, sc dec* around (12).
  14. Stuff, sc dec till you have a small hole, sew shut.
Rays: Chain 43, join with a slip stitch in to a ring. *Sc in the next chain, hdc in then next , [dc, tr, dc] all in one chain, hdc in the next, sc in the next, sl st in the next* 7 times, bind off, leaving a long tail.
Sew the ray piece on to the sun. Embroider on the face and glue on the cheeks.
P.S. If you try this pattern, please leave a comment! I would also love to see a picture of the finished product:)

Friday, September 5, 2008

How to Crochet Amigurumi Eyeballs

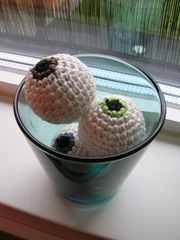
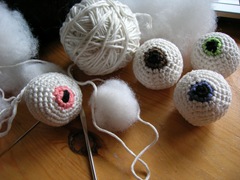
Yes, really. I crocheted some eyeballs.
I don't own a small jar, so to display them I opted for a glass. The problem with this is that they don't look remotely scary. More like a ...cocktail.
091
Mine are about the size of a real eyeball, I think. And no, I have no idea what to do with them.
PATTERN
Chain 2 with black.
  1. Into the second ch from the hook  5 sc.
  2. With the colour of your choice, sc inc around (10).
  3. With white, *sc, sc inc* around (15).
  4. *2 sc, sc inc* around (20).
  5. *3 sc, sc inc* around (25).
  6. *4 sc, sc inc* around (30).
  7. Sc around.
  8. Sc around.
  9. Sc around.
  10. *4 sc, sc dec* around (25).
  11. *3 sc, sc dec* around (20).
  12. *2 sc, sc dec* around (15).
  13. *1 sc, sc dec* around (10).
  14. Sc dec around, stuff, sew shut.
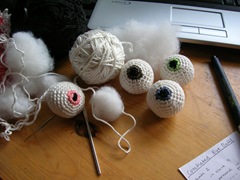
Bonus photos! This is what my desk looks like, when I'm working on a pattern.
125
120
P.S. If you try this pattern, please leave a comment! I would also love to see a picture of the finished product:)

Monday, September 1, 2008

Tuesday, August 19, 2008

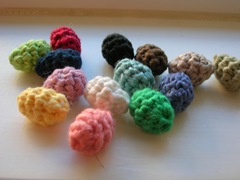
How to Crochet Bertie Bott's Every Flavor Beans

168  169
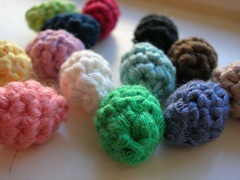
I adore Harry Potter. So, in a moment of inspiration I crocheted some  Bertie Bott's Every Flavor Beans.
They might be completely useless and ...silly. But they make me really happy!
It's also a good project for using up scrap thread. Make one in every colour you own!
PATTERN
  1. Chain 2.
  2. 1. Into the second ch from the hook sc 5.
  3. 2. Sc inc in the next, 1 sc, sc inc, 1 sc, sc inc (8).
  4. 3. Sc around (8)
  5. 4. Sc around (8)
  6. 5. Sc dec twice, stuff, sew shut.
P.S. If you try this pattern, please leave a comment! I would also love to see a picture of the finished product:)

Friday, August 15, 2008

How to Crochet an Amigurumi Life Belt


I really like all things nautical, and stripes in general, so I thought I’d crochet a little life belt.
It didn’t turn out perfect; especially the side with the decreases is a bit wonky (I’ve decided this is the back side...). Wonkyness and all, here’s the pattern anyway. I’m thinking it might look really nice on a Christmas tree. Or you know, to hold silly eggs... Don't judge.
I used red and white, and blue and white, but you could use any other colour combination according to your preferences.
PATTERN
Chain *4 with red, 4 with white* 4 times (32)
1. Sc *4 with red, 4 with white* 4 times (32)
2. *sc, sc inc, sc, sc inc with red, sc, sc inc, sc, sc inc with white* 4 times (48)
3. Sc *6 with red, 6 with white* 4 times (48)
4. *sc, sc inc, sc, sc inc, sc, sc inc with red, sc, sc inc, sc, sc inc, sc, sc inc with white* 4 times (72)
5. Sc *9 with red, 9 with white* 4 times (72)
6. Sc *9 with red, 9 with white* 4 times (72)
7. Sc *9 with red, 9 with white* 4 times (72)
8. *sc, sc dec, sc, sc dec, sc, sc dec with red, sc, sc dec, sc, sc dec, sc, sc dec with white* 4 times (48)
9. Sc *6 with red, 6 with white* 4 times (48)
10. *sc, sc dec, sc, sc dec with red, sc, sc dec, sc, sc dec with white* 4 times (32)
11. Sc *4 with red, 4 with white* 4 times (32)
Join first and last rows matching the stripes carefully. Sew together, stuffing firmly along the way. If you start stuffing when there is a small opening left, you won’t be able to get the stuffing to all the bends. Finish off.
P.S. If you try this pattern, please leave a comment. I would also love to see a picture of the finished product:)

Tuesday, August 12, 2008

Silly Eggs Crochet Pattern


Here is another amigurumi pattern I made for...uh, eggs. Yes. Indeed.
I saw a picture somewhere in the Internet (I’m sorry I don’t remember where!) of a crocheted egg, and it was so cute I wanted to try it for myself. That's the one on the right. Then I made another. With a different face...
Mine is about the size of a regular chicken egg, but I used a really small hook (1, 50) so if you use a bigger one, the egg will be bigger also…
PATTERN
Chain two.
1. 6 sc in the second from the hook
2. 2 sc in each sc around (12 )
3. *sc in the next sc, sc inc in the next sc* repeat around (18)
4. sc around
5. *sc in the next 2 sc, sc inc * (24)
6. sc around
7. sc around
8. *sc in the next 3 sc, sc inc* (30)
9. sc around
10. sc around
11. sc around
12. sc around
13. sc around
14. sc around
15. *sc in the next 3 sc, sc dec* (24)
16. *sc in the next 2 sc, sc dec* (18)
17. *sc in the next sc, sc dec* (12)

Stuff firmly.
Embroider the face.
Sc dec around until you have a small hole, sew shut.
Glue on the felt.

Well, then. You now have a silly egg!
Alternative faces:

P.S. If you try this pattern, please leave a comment! I would also love to see a picture of the finished product:)

Thursday, July 31, 2008

Liquorice Allsorts


I have a thing for crocheted food. It's so cute! I talk a lot about usefulness of items, and crocheted food has no use! I wish I could say I was crocheting them as play food for a child or something, but really I'm crocheting them for myself. I even have a cake stand to display them. It's like an imaginary tea party. Of a mad hatter.
Anyhow, these liquorice (or licorice) are really easy to make. You just crochet squares (mine were 7 sc wide and 5 rows high, but you should adjust the measurements according to your yarn and hook sizes) in black, white, and other colors of your choice. This a good project for using up leftover yarn. To assemble, place the squares in the order you want on top of each other. In the picture I have color-black-color, and color-black-white-black-color liquorice. Both the top layers should be of the same color. Sew together through all layers with the color of the top layers.
That's it! It's a very quick project.

Tuesday, July 29, 2008

How to Crochet an Amigurumi Cloud

This post may contain affiliate links*.
Here's a pattern I made for an amigurumi cloud.

If you are new to amigurumi: amigurumis are small Japanese crocheted stuffed toys. They can be anything from dolls, to food, to clouds! Amigurumi is worked in a spiral so don't join the rounds! I also have several other amigurumi patterns here on my blog, check them out too!

This cloud is easy to crochet, but a bit hard to explain. Because of this the pattern involves a bit of counting... Once you get the hang of how the increases and decreases line up, though, you can forget the counting.

Because all the inc and dec have to be in line (on the top of the cloud), they don't actually really follow rows, but I think the pattern is easier to understand this way. So if the instructions for a certain "row" stop in the middle of the real row or go on to next row, don't panic, this is meant to be! If you have any questions , don't hesitate to ask!

Since the bends are ment to be sharp, the pattern has increases were you sc 3 times into a sc instead of the more common sc inc were you only sc 2 times into a sc. I've marked these as 3sc. There might be a real term for this, but I'm too lazy to try and find it at the moment...

Also, you should stuff as you go, so that all the bends will get enough stuffing.

NOTE ON MATERIALS: 

I personally used a size 2mm crochet hook*, and sports weight cotton yarn* but feel free to pick any yarn you like and a hook that suits your yarn. The cloud will be bigger or smaller than mine accordingly. As with all amigurumi patterns, use a NON-STRETCHY yarn; stretching will cause gaps and your filling will show. This is a no-no in amigurumi. You can easily test this by pulling the yarn a bit between your fingers. In general cotton is good and wool bad. Also unless you crochet very tightly to begin with I recommend you choose a smaller hook than recommended by your yarn, that way there will be no gaping between the stitches. You will usually find a one that suits your personal style only by trial and error.

With all that out of the way, let's get onto the pattern!

PATTERN

Chain 2.
  1. Sc 6 times in the second ch from the hook.
  2. 2sc in each sc.
  3. Sc around.
  4. Sc dec once, sc in the next 10 sc.
  5. 3sc in the next, sc in the next 10 sc.
  6. 3sc in the next, sc, 3sc, sc in the next 13 sc.
  7. 3sc in the next, sc in the next 16 sc.
  8. 3sc in the next, sc, 3sc, sc in the next 19 sc.
  9. 3sc in the next, sc in the next 22.
  10. 3sc in the next, sc, 3sc, sc in the next 25 sc.
  11. Sc in the next 25 sc.
  12. Sc dec twice, sc, sc dec twice, sc in the next 20 sc.
  13. Sc dec, sc, sc dec, sc in the next 19 sc.
  14. Sc dec, sc, sc dec, sc in the next 17 sc.
  15. Sc dec, sc, sc dec, sc in the next 17 sc.
  16. 3sc in the next, sc in the next 18 sc.
  17. 3sc in the next, sc, 3sc, sc in the next 18 sc.
  18. Sc in the next 24 sc.
  19. Sc dec twice, sc, sc dec twice, sc in the next 14 sc.
  20. Sc dec twice, sc, sc dec twice, sc in the next 10 sc.
  21. Sc dec twice, sc, sc dec twice, sc in the next 11 sc.
  22. 3sc in the next, sc in the next 22 sc.
  23. Sc dec 8 times, stuff, sew shut.
Cute face optional:)

P.S. If you try this pattern, please leave a comment. I would also love to see a picture of the finished product:)

EDIT: A lot of people seem to have trouble with this pattern, so I made a step-by-step tutorial on how to crochet one, with pictures! So hop over to the post about amigurumi cloud troubleshooting. Hopefully you'll find it helpful!

Related Posts Plugin for WordPress, Blogger...