Saturday, August 30, 2008

Goth Strawberry

The Goth part was quite accidental. I run a cross this strawberry pincushion pattern at Martha Stewart. I wanted to try it right away, but only had pink and black felt. Well, then.

014

I changed the pattern a bit. I made the end flat instead sharp to get the shape I wanted, and cut about 1cm off from the long edge to make the strawberry shorter. I also completely winged the stem.

003

I'm not sure what to do with the strawberry, since it's stuffed with regular polyfil and does not sharpen the pins like it's supposed to.  The pins would suit the Goth theme, though.

Friday, August 29, 2008

Baby Chicken

This has to be my favourite amigurumi pattern. It is fast, easy and cuuute! The pattern is from Craftster by MarjorieCrochets. She calls it a baby duck, but I always think them as chicks.

I've made seven, I think, but have given some of them as gifts. Here are the remaining four.

152

Wednesday, August 27, 2008

Amigurumi Voodoo Doll

My brother wanted me to post the voodoo doll I made, so here it is.
018
It's based on a picture of a crocheted voodoo doll I saw somewhere in the Internet, and made (once again) by horribly abusing the sweet bear pattern.
015
You could use it as a pin cushion, but I feel a bit icky about sticking pins in it. Since I made it, there is a good chance it's full of my hair.

Monday, August 25, 2008

Black and White Striped Scarf

033

I've wanted a scarf like this for awhile now.

I'm allergic to wool, so I had to think of something else .

 039

The first version I tried was made out of cotton; it looked the way I liked, but was too heavy to actually  use.

So, this one is made of acrylic. It's light and soft.

036

The bow brooch is from here.

Wednesday, August 20, 2008

Green Wolf

234

I made another amigurumi following the instructions from monday. A green wolf. In the picture he is with the panda I made following the crochet bear pattern. The panda was one of the first amigurumis I ever made, along with the amineko. While they are both adorable, I think the round head is somehow a bit more ... amigurumi like? The picture is quite dark once again, but you can see the head difference between the two patterns.

Tuesday, August 19, 2008

How to Crochet Bertie Bott's Every Flavor Beans

168  169
I adore Harry Potter. So, in a moment of inspiration I crocheted some  Bertie Bott's Every Flavor Beans.
They might be completely useless and ...silly. But they make me really happy!
It's also a good project for using up scrap thread. Make one in every colour you own!
PATTERN
  1. Chain 2.
  2. 1. Into the second ch from the hook sc 5.
  3. 2. Sc inc in the next, 1 sc, sc inc, 1 sc, sc inc (8).
  4. 3. Sc around (8)
  5. 4. Sc around (8)
  6. 5. Sc dec twice, stuff, sew shut.
P.S. If you try this pattern, please leave a comment! I would also love to see a picture of the finished product:)

Monday, August 18, 2008

Little Red Riding Hood Amigurumi Bear

037 038 Excuse the monster title. I wanted to be sure to get all characteristics included.

Also, at first there is no light and then there’s too much light.

This is probably my favourite of all the amigurumis I’ve ever made (that’s not a lot though). Anyway, she’s just too cute!

The story: I really liked all those cute big headed amigurumis I kept seeing all around the Internet, but as I was just starting out my amigurumi hobby, I really could not figure out how to make one without a pattern. I don’t own a credit card, and have no money anyway to purchase those cute patterns people are selling.

However, (eventually) I realized I could get the results I wanted by combining patterns. So, the head for my little bear is made with the amineko pattern and all the rest is from this cute bear pattern from Crochetville. I did some changes on the bear pattern; in the legs I didn’t crochet in the back loops and I made the arms poseable.

I have no idea how I managed to make the hood. I was just staring at my new cute bear, and thought she would look even cuter with a hood. Insanity. I crocheted and took the hood out countless of times, and all in all spend probably more time doing the damned hood, than the bear itself. Horror.

But I was right. She is even cuter with the hood.

Friday, August 15, 2008

How to Crochet an Amigurumi Life Belt


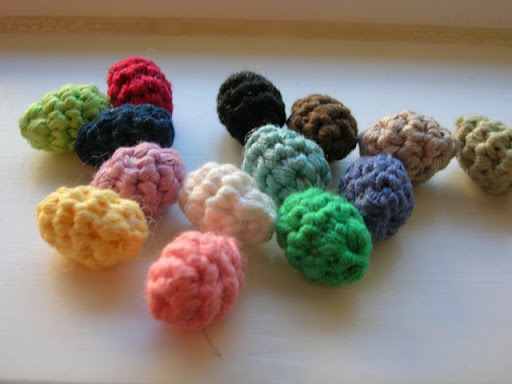
I really like all things nautical, and stripes in general, so I thought I’d crochet a little life belt.
It didn’t turn out perfect; especially the side with the decreases is a bit wonky (I’ve decided this is the back side...). Wonkyness and all, here’s the pattern anyway. I’m thinking it might look really nice on a Christmas tree. Or you know, to hold silly eggs... Don't judge.
I used red and white, and blue and white, but you could use any other colour combination according to your preferences.
PATTERN
Chain *4 with red, 4 with white* 4 times (32)
1. Sc *4 with red, 4 with white* 4 times (32)
2. *sc, sc inc, sc, sc inc with red, sc, sc inc, sc, sc inc with white* 4 times (48)
3. Sc *6 with red, 6 with white* 4 times (48)
4. *sc, sc inc, sc, sc inc, sc, sc inc with red, sc, sc inc, sc, sc inc, sc, sc inc with white* 4 times (72)
5. Sc *9 with red, 9 with white* 4 times (72)
6. Sc *9 with red, 9 with white* 4 times (72)
7. Sc *9 with red, 9 with white* 4 times (72)
8. *sc, sc dec, sc, sc dec, sc, sc dec with red, sc, sc dec, sc, sc dec, sc, sc dec with white* 4 times (48)
9. Sc *6 with red, 6 with white* 4 times (48)
10. *sc, sc dec, sc, sc dec with red, sc, sc dec, sc, sc dec with white* 4 times (32)
11. Sc *4 with red, 4 with white* 4 times (32)
Join first and last rows matching the stripes carefully. Sew together, stuffing firmly along the way. If you start stuffing when there is a small opening left, you won’t be able to get the stuffing to all the bends. Finish off.
P.S. If you try this pattern, please leave a comment. I would also love to see a picture of the finished product:)

Thursday, August 14, 2008

Bow Brooch


I made this bow following instructions at an apple a day. It was very easy to make; the most difficult part was to decide whether to make it into a barrette or a brooch. I don't really wear barrettes, although I adore the way they look on others. I'm not sure I'll wear the brooch either, but well, it was fun to make! And if I at some point decide to wear it in my hair, it'll be easy enough to attach to a clip.

The back side looks quite horrifying, because, you know, who wants to sew when you can use a glue gun?

Wednesday, August 13, 2008

Padded Hanger


I have a few dresses that seem to be unable stay on a hanger. They just slide off into a crumpled pile amongst my shoes. And that's just not hygienic...

This is another project inspired by Storage & Display (I love that book!).

I made my hanger out of one of those free, ugly plastic hangers they use to hang clothes in stores. I was going to throw it away and then thought "...or I could decorate it".

I just cut a piece of fabric little bigger than the hanger, sew the top edge with machine (right sides facing each other), leaving a small hole in the middle for the hook part. The fabric is a quite horrible camo pattern, I know, but it was what I had laying around. Also, I think there is something sort of cool about hanging your dress on a camo hanger... Moving on: turn the right side out, insert the hanger, stuff, and hand sew the bottom edge. A pain, but had to be done. Sew on the buttons to keep the garment from sliding off. The buttons are from an old blouse; I'm all for recycling.

P.S. Hyvää syntymäpäivää, isä!

Tuesday, August 12, 2008

Silly Eggs Crochet Pattern


Here is another amigurumi pattern I made for...uh, eggs. Yes. Indeed.
I saw a picture somewhere in the Internet (I’m sorry I don’t remember where!) of a crocheted egg, and it was so cute I wanted to try it for myself. That's the one on the right. Then I made another. With a different face...
Mine is about the size of a regular chicken egg, but I used a really small hook (1, 50) so if you use a bigger one, the egg will be bigger also…
PATTERN
Chain two.
1. 6 sc in the second from the hook
2. 2 sc in each sc around (12 )
3. *sc in the next sc, sc inc in the next sc* repeat around (18)
4. sc around
5. *sc in the next 2 sc, sc inc * (24)
6. sc around
7. sc around
8. *sc in the next 3 sc, sc inc* (30)
9. sc around
10. sc around
11. sc around
12. sc around
13. sc around
14. sc around
15. *sc in the next 3 sc, sc dec* (24)
16. *sc in the next 2 sc, sc dec* (18)
17. *sc in the next sc, sc dec* (12)

Stuff firmly.
Embroider the face.
Sc dec around until you have a small hole, sew shut.
Glue on the felt.

Well, then. You now have a silly egg!
Alternative faces:

P.S. If you try this pattern, please leave a comment! I would also love to see a picture of the finished product:)

Monday, August 11, 2008

Magnets to Be


Today is the first day of my vacation! And it's overcast and dreary...

My apartment faces north, so in this kind of weather there is absolutely no light to do any kind of photographing. Sad.

Anyway, here are some pictures I found at the flea market the other day. On one hand they look cute, on the other - sort of retarded... :) Regardless, they are going to be made into magnets later on! Maybe it's just the baby chicken (and also the colors), but they look like Easter magnets to me... Hmm, theme magnets...

Thursday, August 7, 2008

Lip Balm Key Fob

I use lip balm several times a day: after I've washed my teeth, after I've eaten, before I leave home, when I'm bored... All the time really. I used to have several tubes of lip balm in different pockets and bags and I was always loosing them.

That is, until I saw a picture of a crocheted lip balm cozy somewhere in the Internet (probably Craftster). 

I always have my key (I really only have one) with me, and with the lip balm cozy attached to the key I now always know where to find my balm. No more chapped lips!

The cozy is just a really simple crocheted tube with a button closure; you can make it to fit exactly your lip balm. I crocheted a metal hook on to the cozy so that I can easily clip it on and off the key.

Also pictured: the worlds best lip balm:)

Wednesday, August 6, 2008

Book Weight

This is more of a practical than a pretty project.

I read a lot of books, and while reading I usually like to do something else also, mostly crochet. This is especially true if I'm reading for an exam or something else equally boring... Because of this, this book weight is one of the most useful things I have made; it keeps the book open and leaves my hands free.

It is sewn from the same golden linen fabric as the earring holder from yesterday. I made the ends a little wider and the middle little narrower to distribute the weight were it is needed. I stuffed it with some ornamental sand that was on sale (it was bright yellow!), to make it heavy enough.

Now if I actually had time to read something for more than a few minutes at the time...

Tuesday, August 5, 2008

Earring Holder


I wear earrings every day. I used to keep them in a medicine organizer, which was working OK, but wasn't too attractive looking.

I saw a picture of an earring holder in a book called Storage & Display (there are also some other really nice ideas in this book). The earring holder in the book was made out of a picture frame and some sewing pins stuck to it to hang chandelier type of earrings. Since I mostly wear stud earrings the pins wouldn't have worked for me.

I wanted to use white fabric as a base, but didn't have any. So I glued some golden linen that i did have to a piece of cardboard and used a big needle to poke holes for the earrings on it. 

It looks a bit like a piece of art, so I keep it on my bookshelf. At first I wasn't so sure of the combination of gold linen and silver earrings, but now I kind of like it. For some reason it reminds me of ancient Egypt. It looks pretty and the earrings are easily accessible.

Monday, August 4, 2008

Paris and New York Earrings

I bought two pendants at the flea market today. One says Paris and has the Eiffel Tower on it, the other one says New York and has the Statue of Liberty. They cost 3€ each so not exactly cheap. I don't really wear pendants, or any other jewelry for that matter, except earrings. So earrings they became. I just attached them to earring hooks, really simple. The hooks are silver so they don't really compute... I might buy new golden hooks for them sometime. They are a bit heavy, but look too cool:)

Related Posts Plugin for WordPress, Blogger...